Support/FAQ
About Supported Printers and Multi-function Devices |
|
Check the list of supported devices on the Canon Mobile Printing support page.
You can access the support page by following the procedure below. |
| |
 NOTE NOTE
|
| If you specify a print server as the output destination, you cannot automatically discover it from this app. Follow the procedure "Manual Search by Specifying IP Address/DNS."
Multi-function device with external server option installed are not supported in this app. |
|
|
About the Print Functions |
|
Supported Paper Sizes
Letter, 11 x 17, Legal, A4, B4, and A3. |
| |
 NOTE NOTE
|
| Select a paper size that is supported by the device you are using. |
|
| |
Printable Data
Photographs (photographs saved in iOS albums)
Image files (JPEG, GIF, BMP, PNG, TIFF)
PDF files
Microsoft Office files (doc, docx, xls, xlsx, ppt, pptx)
iWork files (Pages, Numbers, Keynote)
Web pages |
| |
 NOTE NOTE
|
Some Microsoft Office files may not preview or print correctly depending on the content of their data. In such cases if you correct the layout with the Data Conversion Service, you can print the file with its original layout. (→"Printng Files")
Web pages cannot be printed by starting Canon Mobile Printing directly from a browser such as Safari. You need to display the web page from the Web menu of Canon Mobile Printing, then print it.
Printing emails is not supported. For an alternative method, see "How to print the text of emails." |
|
| |
|
Selecting/Detecting the Device |
|
|
1.Select or display the image(s)/file/web page you want to print.
For details, see "Printing Images," "Printng Files," or "Printing Web Pages."
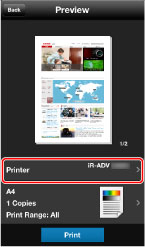
2.In the [Preview] screen of Canon Mobile Printing, tap [Printer].
|
 |
| |
|
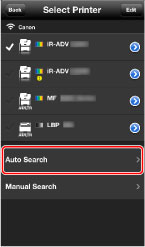
3.In the [Select Printer] screen, select the device you want to use.
|
 |
| |
The registered devices are displayed in list form.
If you are registering a device for the first time, follow the procedure below.
 Automatic Discovery of a Device on the Same Network Automatic Discovery of a Device on the Same Network
 Manual Search by Specifying IP Address/DNS Manual Search by Specifying IP Address/DNS
|
|
| |
| Automatic Discovery of a Device on the Same Network |
 NOTE NOTE
|
|
You can register up to ten devices in the [Select Printer] screen list. If ten devices are already registered, perform a search after deleting a registered device. (→"Confirming Device Information")
Depending on the connection settings or environment of wireless router, you may be not able to discover the device automatically. In this case, search the device manually. |
|
| |
| 1.In the [Select Printer] screen, tap [Auto Search]. |
 |
Discovered devices are displayed.
If the device you want to use is not displayed, follow the procedure "Manual Search by Specifying IP Address/DNS" below.
2.Select the device → tap [Add].
The device is registered in the [Select Printer] screen list. |
| |
| Manual Search by Specifying IP Address/DNS |
 NOTE NOTE
|
| You can register up to ten devices in the [Select Printer] screen list. If ten devices are already registered, perform a search after deleting a registered device. (→"Confirming Device Information") |
|
| |
1.In the [Select Printer] screen, tap [Manual Search]. |
 |
| |
2.Enter the IP address or DNS of the device you want to use → tap [OK]. |
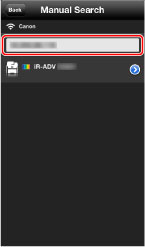 |
To confirm the IP address of the device, see "How to confirm the IP address of the device."
If you search by specifying a DNS, enter the host name or FQDN (format including host name, sub-domain name, and domain name).
When you cannot specify the device with a host name, enter the FQDN.
<FQDN Entry Sample> If the host name is "device01", the sub-domain name is "aaa", and the domain name is "bbb.co.jp":
device01.aaa.bbb.co.jp
3.Select the device → tap [Add].
The device is registered in the [Select Printer] screen list. |
|
Registering a Print Server |
|
| You can register devices other than Canon devices (print servers etc.) as output destinations. |
 NOTE NOTE
|
| You can register up to ten devices in the [Select Printer] screen list. If ten devices are already registered, perform a search after deleting a registered device. (→"Confirming Device Information") |
|
| |
| |
|
1.Select or display the image(s)/file/web page you want to print.
For details, see "Printing Images," "Printng Files," or "Printing Web Pages."
2.In the [Preview] screen of Canon Mobile Printing, tap [Printer].
|
 |
| |
|
3.In the [Select Printer] screen, tap [Manual Search].
|
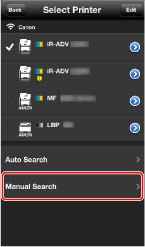 |
4.Enter the IP address or DNS of the device you want to use → tap [Register As]. |
| |
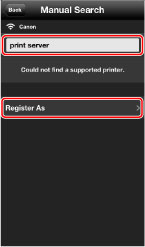 |
| |
To confirm the IP address of the device, see "How to confirm the IP address of the device."
If you search by specifying a DNS, enter the host name or FQDN (format including host name, sub-domain name, and domain name).
When you cannot specify the device with a host name, enter the FQDN.
<FQDN Entry Sample> If the host name is "device01", the sub-domain name is "aaa", and the domain name is "bbb.co.jp":
device01.aaa.bbb.co.jp |
| |
5.In the [Register As] screen, enter a name in [Registered Name]. |
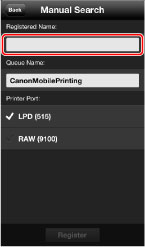 |
| |
6.If required, set [Queue Name] and [Printer Port].
7.Tap [Register].
The device is registered in the [Select Printer] screen list. |
| |
|
|
Confirming Device Information |
|
1.Select or display the image(s)/file/web page you want to print.
For details, see "Printing Images," "Printng Files," or "Printing Web Pages."
2.In the [Preview] screen of Canon Mobile Printing, tap [Printer].
The [Select Printer] screen is displayed. |
| |
| [Select Printer] Screen |
| |
|
Devices registered as output destinations are displayed in list form.
Device List
|
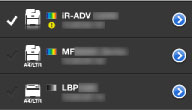 |
The icon indicates the following content.
[ ]: Selected devices ]: Selected devices
[ ]:Devices whose maximum paper width is A4/Letter. ]:Devices whose maximum paper width is A4/Letter.
Devices that do not have this icon can print larger paper sizes than A4/Letter.
[ ]/[ ]/[ ]: Color/B&W printers. ]: Color/B&W printers.
[ ]: There is information from the device. ]: There is information from the device.
Access the Remote UI from the [Printer Detail] screen and check the information. |
| |
|
[Edit]
You can edit the list after tapping [Edit].
|
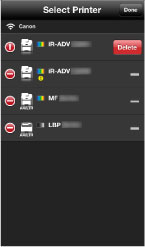 |
[ ]: Drag this to change the order. ]: Drag this to change the order.
[ ]: Tap this and tap [Delete] to delete the device from the list. ]: Tap this and tap [Delete] to delete the device from the list.
[ ] (Access Point) ] (Access Point)
Displays the wireless LAN connection state and access point SSID. |
| |
| [Printer Detail] Screen |
Tapping [ ] in the [Select Printer] screen enables you to check detailed information. ] in the [Select Printer] screen enables you to check detailed information. |
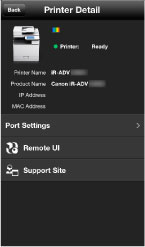 |
| Displays the device status, [Printer Name], [Product Name], [IP Address], and [MAC Address]. |
| |
[Port Settings]
You can set the queue name and type of printer port of the device.
[Remote UI]
You can access the Remote UI for the device. When a [Check the details using the Remote UI.] message is displayed in [Printer], access it to check the information. |
| |
 NOTE NOTE
|
| The Remote UI does not support operations from mobile terminals. You may not be able to use some functions. |
|
| |
[Support Site]
You can access the Canon support site. |
|
Printing Images |
|
1.In the Home screen of your Apple device, tap [CanonMPrint]. |
 |
| |
|
1.In the top screen of Canon Mobile Printing, tap [Photo Albums].
|
 NOTE NOTE
|
| If you are using iOS 5.1, the location confirmation message may be displayed. Although Canon Mobile Printing does not use location information, if you are using the photo album function when printing, tap [OK] in the message. |
|
| |
2.Select an album → tap the image(s) you want to print. |
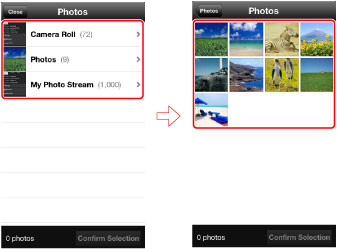 |
Only image files whose formats are printable are displayed.
3.In an iPhone, tap [Select] in the enlarged preview.
4.If you want to print multiple images, repeat steps 2-4.
You can select up to 20 images at one time.
5.In an iPhone, tap [Confirm Selection].
6.Tap [Preview].
Tapping a thumbnail displays an enlarged preview in the [Preview] screen. If you want to print multiple images, you can confirm the second and subsequent images in the enlarged preview.
To cancel your selection, tap [ ]. ].
7.In the [Preview] screen, confirm or select the device you want to use. |
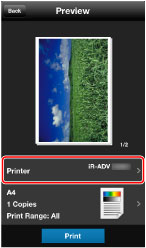 |
The device name you selected last time is displayed in [Printer].
To select a new device, tap [Printer] → select the device → return to the [Preview] screen.
For details on how to configure the settings, see "Selecting/Detecting the Device."
8.If required, tap the print settings → configure the required settings → return to the [Preview] screen.
For details on how to configure the settings, see "Changing the Print Settings."
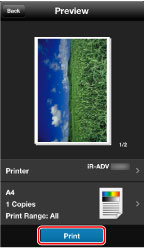
9.Tap [Print] in the [Preview] screen. |
 |
 NOTE NOTE
|
| If you activate the camera from this app, you can print the photograph you have just taken. You can activate the camera by tapping [Camera] in the top screen of Canon Mobile Printing. After tapping [Use Photo] in the confirmation screen, the photograph you take is stored in a Camera Roll such that it can be selected for printing. |
|
|
Printing Files |
|
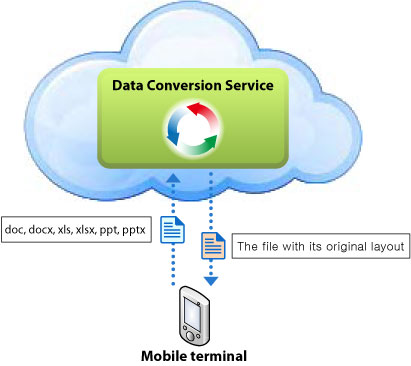
When printing a Microsoft Office file, by performing layout correction using the Data Conversion Service on the Internet, you can print the file with its original layout.
If you use the Data Conversion Service, a rendering process is performed by communicating with a server on the Internet. Depending on the content of the data to be printed and the communication environment you are using, data uploading and downloading may take several minutes each.
|
 |
|
|
 NOTE NOTE
|
If you do not use the Data Conversion Service, the print data may not be laid out correctly when output.
If the Data Conversion Service stops, you will be informed on the web site. (→"How to Check Data Conversion Service Maintenance Information")
You can upload files of up to 20 MB to the Data Conversion Service. You cannot convert password-protected files, files whose data is unauthorized or corrupted, and empty files. Also, you cannot download files of more than 99 pages after data conversion. |
|
| |
1.Open the file you want to print in the corresponding app.
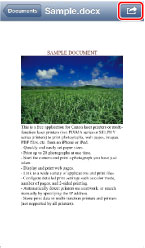
2.Tap [ ]/[Open in] → tap [CanonMPrint]. ]/[Open in] → tap [CanonMPrint]. |
 |
3.For Microsoft Excel files (xls and xlsx), in the screen for selecting a sheet, select the sheet you want to print → tap [Print]. |
 NOTE NOTE
|
| If you use the Data Conversion Service, all sheets are subject to printing even if you select a sheet or sheets in this procedure. After data conversion, delete unwanted pages in the [Preview] screen. |
|
| |
| 4.In the [Preview] screen, confirm or select the device you want to use. |
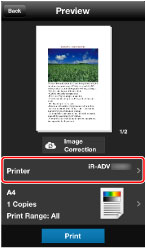 |
The device name you selected last time is displayed in [Printer].
To select a new device, tap [Printer] → select the device → return to the [Preview] screen.
For details on how to configure the settings, see "Selecting/Detecting the Device."
5.If required, tap Print Settings → configure the required settings → return to the [Preview] screen.
For details on how to configure the settings, see "Changing the Print Settings."
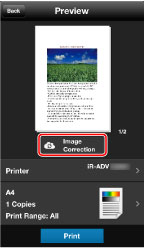
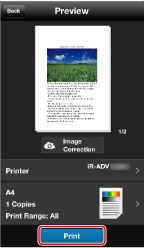
6.When you print a Microsoft Office file using the Data Conversion Service, tap [Image Correction]. |
 |
If you can tap [Print] in the [Preview] screen before all rendering by the Data Conversion Service is complete, printing is started. Because the rendering and printing processes are being executed in parallel, the processing time is shortened. However, If you specify the print range in an Excel file (xls and xlsx), you cannot do so until all the data has finished being converted.
Files that have simple layouts and text may only suffer minimal layout errors if you do not use the Data Conversion Service. If there appear to be no problems when you check the preview, tapping [Print] without tapping [Image Correction] will print the file with the mobile terminal OS performing the rendering process. In this case, although the shorten the processing time compared to using the Data Conversion Service, there is a possibility of the file being printed with an incorrect layout.
7.In the [Preview] screen, check the preview image.
If you tap the file image, an enlarged preview is displayed. If you are printing a file of multiple pages, you can check the second and subsequent pages as enlarged previews.
To cancel your selection, tap [ ]. ].
8.Tap [Print]. |
 |
|
Printing Web Pages |
|
1.In the Home screen of your Apple device, tap [CanonMPrint]. |
 |
|
|
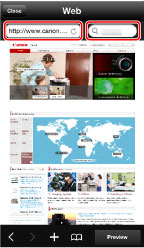
1.In the top screen of Canon Mobile Printing, tap [Web].
2.Display the web page you want to print by entering a URL or searching with keywords. |
| |
 |
| |
Tapping [+] enables you to bookmark the page you are displaying. Also, tapping [ ] displays registered bookmarks. ] displays registered bookmarks.
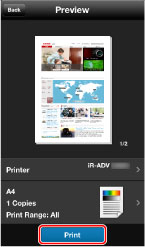
3.Tap [Preview].
Tapping a thumbnail displays an enlarged preview. If you want to print multiple images, you can confirm the second and subsequent images in the enlarged preview.
4.In the [Preview] screen, select the device you want to use. |
| |
 |
| |
The device name you selected last time is displayed in [Printer].
To select a new device, tap [Printer] → select the device → return to the [Preview] screen.
For details on how to configure the settings, see "Selecting/Detecting the Device."
5.If required, tap Print Settings → configure the required settings → return to the [Preview] screen.
For details on how to configure the print settings, see "Changing the Print Settings."
6.Tap [Print] in the [Preview] screen. |
| |
 |
| |
 NOTE NOTE
|
| You cannot start Canon Mobile Printing directly from Safari and print. Copy the URL from Safari, then paste the URL into the [Web] screen of this app to display and print the web page. |
|
|
Saving Data in an Inbox |
|
If you are using a device that supports the inbox function, you can store print data in an inbox of the device. You can print, change the settings of, and combine stored data from the control panel of the device or the Remote UI.
1.Select or display the image(s)/file/web page you want to print.
For details, see "Printing Images," "Printng Files," or "Printing Web Pages."
2.In the [Preview] screen of Canon Mobile Printing, confirm or select the device you want to use. |
 |
|
|
The device name you selected last time is displayed in [Printer].
To select a new device, tap [Printer] → select the device → return to the [Preview] screen.
For details on how to configure the settings, see "Selecting/Detecting the Device."
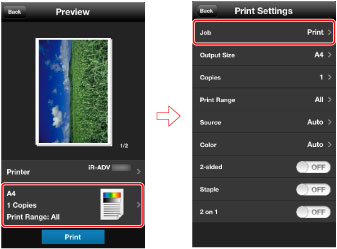
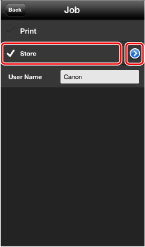
3.Tap Print Settings → tap [Job]. |
| |
 |
| |
4.Select [Store] → tap [ ]. ]. |
| |
 |
| |
5.In the [Store] screen, select an inbox number as a store destination → tap [Back]. |
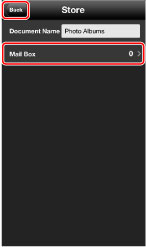 |
If required, you can also change the document name.
6.Return to the [Job] > [Print Settings] > [Preview] screen.
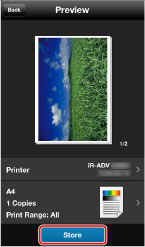
7.In the [Preview] screen, tap [Store]. |
 |
 NOTE NOTE
|
| For information about printing the file in the inbox, refer to the manuals provided with the device.. |
|
|
Changing the Print Settings |
|
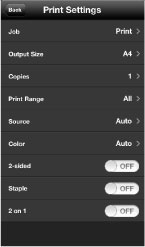
Tap the items you want to change in the [Preview] > [Print Settings] screen.
Descriptions of Settings |
 |
|
|
[Job]
Select an output method for print data.
[Print]: Performs normal printing.
[Store]: Stores the print data in an inbox in the device. (→ "Saving Data in an Inbox")
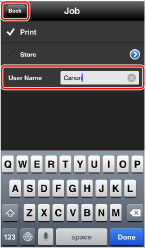
[User Name]: Displays the user name for the print. You can change the user name by tapping it. (→ "Changing the User Name for the Print Data")
[Output Size]
Select the paper size to be printed on.
[Copies]
Set the number of copies to be printed.
[Print Range]
Set the range of pages to be printed.
[Source]
Select [Auto] (uses the device setting) or [Tray].
[Color]
Switches between color and grayscale (black and white) printing. Select [Auto] for normal situations.
[2-sided]
Switches between 1-sided and 2-sided printing.
[Staple]
Switches whether to staple the pages.
[2 on 1]
Switches whether to print two pages on one sheet of paper. |
|
Changing the User Name for the Print Data |
|
The default setting name of the mobile terminal is the user name. If you manage a print job at the device, you can change the user name if required.
1.Select or display the image(s)/file/web page you want to print.
For details, see "Printing Images," "Printng Files," or "Printing Web Pages."
2.In the [Preview] screen of Canon Mobile Printing, select the device you want to use. |
 |
|
|
The device name you selected last time you printed is displayed in [Printer].
To select a new device, tap [Printer] → select the device → return to the [Preview] screen.
For details on how to configure the settings, see "Selecting/Detecting the Device."
3.Tap Print Settings → tap [Job]. |
 |
4.Tap [User Name].
5.Enter a user name→ tap [Back]. |
 |
6.Return to the [Job] > [Print Settings] > [Preview] screen.
7.In the [Preview] screen, tap [Print]. |
 |
|
The Device is Not Detected |
|
Check the following:
Does the device you are using support Canon Mobile Scanning for Business? (→ About Support Devices)
Are the Wi-Fi settings enabled on your mobile terminal?
Is Bluetooth turned off on your mobile terminal?
Does the wireless network your mobile terminal is connected to and the network your device is connected to match?
If the device is not on the same network, follow the procedure "Selecting/Detecting the Device" > "Manual Search by Specifying IP Address/DNS."
Connection settings of wireless router:
Depending on the connection environment, you may be not able to discover the device automatically. In this case, follow the procedure "Selecting/Detecting the Device" > "Manual Search by Specifying IP Address/DNS."
Did you enter a FQDN (format including host name, sub-domain name, and domain name) when searching for devices by specify DNS?
<FQDN Entry Sample> If the host name is "device01", the sub-domain name is "aaa", and the domain name is "bbb.co.jp":
device01.aaa.bbb.co.jp
Network settings of the Canon device:
Is <SNMPv1> set to [On]?
Is the LPR port set to [On]?
Is the gateway address set correctly?
Is the subnet mask set correctly? |
|
How to print the text of emails |
|
Email text printing is not supported.
You can print an email using the following method.
|
| |
Save the email screen as a screenshot and print:
Pressing and holding both the power button and the sound reduction button of the mobile terminal saves screenshot image data. You can print the saved screenshot with the photo album function of this app. (→ "Printing Images") |
|
A File is not printed correctly |
|
If you activate Canon Mobile Printing from other apps and print document files other than PDF files, they may not be able to be previewed or printed correctly.
When printing a Microsoft Office file, by performing layout correction using the Data Conversion Service, you can print the file with its original layout. (→ "Printng Files") |
|
Black and white data is counted as color data |
|
Some devices may count black and white data as color data when printing from Canon Mobile Printing.
To have black and white data counted as black and white data, print using one of the following procedures.
Change the print settings:
Tap Print Settings in the preview screen when executing printing, and select [Color] - [B&W].
Print without using the [Photo Albums] function:
If you read an image into [Photo Albums] via iTunes on a computer, the colors may be adjusted and converted into color data in iTunes.
If this happens, open the image in iOS, and print it using Canon Mobile Printing in [ ] - [CanonMPrint]. (→"Printng Files") ] - [CanonMPrint]. (→"Printng Files") |
|
Printing Method from iWork 2.0 |
|
As well as printing files in iWork format by starting this app from iWork for iOS 2.0 (Pages, Numbers, Keynote) and printing files, you can print using the following method. |
 NOTE NOTE
|
For information about how to operate iWork 2.0, refer to the iWork help.
If you print using the following method, there may be cases where the print job is not output with completely the same layout as the original.
|
|
| |
Convert to PDF Format with iWork and Print
If you select "PDF" for [Format] when opening the file in iWork 2.0 (Pages, Numbers, Keynote) and start this app, you can print with the original layout.
Printing Microsoft Office Files
You can open Microsoft Office files (doc, docx, xls, xlsx, ppt, pptx) in iWork 2.0. If you select "PDF" for [Format] when starting this app, you can print the almost the same layout as the original. |
 NOTE NOTE
|
| If you want to print documents with a layout that is more faithful to the original, open the file with Microsoft Office rather than iWork, start this app, and use Data Conversion Service. (→ "Printing Files") |
|
|
|
|
|